因为收集了很多萌萌的动图表情包,然鹅它们的分辨率都太低了,所以就有了将这些表情包高清化的想法(๑‾ ꇴ ‾๑)
比如下面的这只小埋,分辨率就只有 176x180……

放大动漫图片一般都是使用 waifu2x 算法,因为自己有 N 卡所以会使用 N 卡专用的 waifu2x-caffe,虽然能把 GIF 拖进去但是放大后的图片会变成只有第一帧的静态图片,所以就需要别的方法了。
在 Google 上找了一下,找到了这篇文章,尝试用 ImageMagick 把 GIF 的每一帧拆出来,使用 waifu2x 放大每一张图以后再拼回去,倒是个不错的想法(我好像用类似的方法,不过是用来放大视频 233)
因为步骤还是有些繁琐,所以原文也写了若干个 Bash 脚本来自动完成使用 ImageMagick 拆图和生成 GIF 的步骤,不过 waifu2x-caffe 明明是 Windows 上的软件,难道作者是想着把图片从 Linux 复制到 Windows 里面,放大以后再拼回去?还是有点麻烦,所以就打算自己写个 PowerShell 脚本,自动在 Windows 系统内直接完成所有操作∠( ᐛ 」∠)_
在写脚本之前,首先需要准备两个软件:
对于 waifu2x-caffe,只有 N 卡才可以使用 GPU 加速,A 或 I 卡用户就只能选择慢如蜗牛的 CPU 计算了,当然也可以另请高明,使用其它调用 waifu2x 算法的软件~
N 卡用户还可以考虑开启 cuDNN 继续提速,只需要找一个 cudnn64_7.dll 和 waifu2x-caffe.exe 放在同一个目录就可以了。
指定路径
waifu2x-caffe 有图形界面,不过脚本里调用的是它的命令行版程序。先在脚本里指定一些路径:
# waifu2x-caffe和ImageMagick的程序路径
$Waifu2xCUIPath = 'D:\waifu2x-caffe\waifu2x-caffe-cui.exe'
$MagickPath = 'D:\ImageMagick-7.0.8-Q16-HDRI\magick.exe'

# 将路径转换为绝对路径
$InputFile = $ExecutionContext.SessionState.Path.GetUnresolvedProviderPathFromPSPath($InputFile)
$OutputFile = $ExecutionContext.SessionState.Path.GetUnresolvedProviderPathFromPSPath($OutputFile)

# 指定GIF帧的保存路径
$InputDirectory = [IO.Path]::GetDirectoryName($InputFile)
$OutputDirectory = [IO.Path]::GetDirectoryName($OutputFile)
$SourceDirectory = ($InputDirectory + '\temp_frames_source')
$UpscaledDirectory = ($InputDirectory + '\temp_frames_upscaled')
拆分图片
GIF 图片把帧拆出来不难,但是除了每一帧的图片,还应该把每一帧的时间信息保存下来,否则就没办法把放大后的图片拼回 GIF 了。ImageMagick 的 identify 工具可以获取 GIF 每一帧的时间,还可以使用类似于 printf() 的格式化字符串自定义输出。为了方便起见,这里就直接把输出格式自定义为后面合成 GIF 时需要的参数:
&$MagickPath identify -format ("-delay %T \`"" + $UpscaledDirectory.Replace('\', '\\') + "\\frame-%s.png\`" ") $InputFile把上面的小埋丢进来,得到的输出是这样的(已添加换行):
-delay 10 "C:\Users\Admin\Desktop\temp_frames_upscaled\frame-0.png"
-delay 10 "C:\Users\Admin\Desktop\temp_frames_upscaled\frame-1.png"
-delay 10 "C:\Users\Admin\Desktop\temp_frames_upscaled\frame-2.png"
-delay 10 "C:\Users\Admin\Desktop\temp_frames_upscaled\frame-3.png"
...
从这里也可以看出,原图中的每一帧的时间都是 0.1 秒。可以将这些输出保存到文件中,只要添加管道输出 Out-File ($InputDirectory + '\' + [IO.Path]::GetFileNameWithoutExtension($InputFile) +'.txt') -Encoding utf8 就可以了。
然后就是拆图的操作:
if (-not (Test-Path $SourceDirectory)) {
    mkdir $SourceDirectory | Out-Null
}
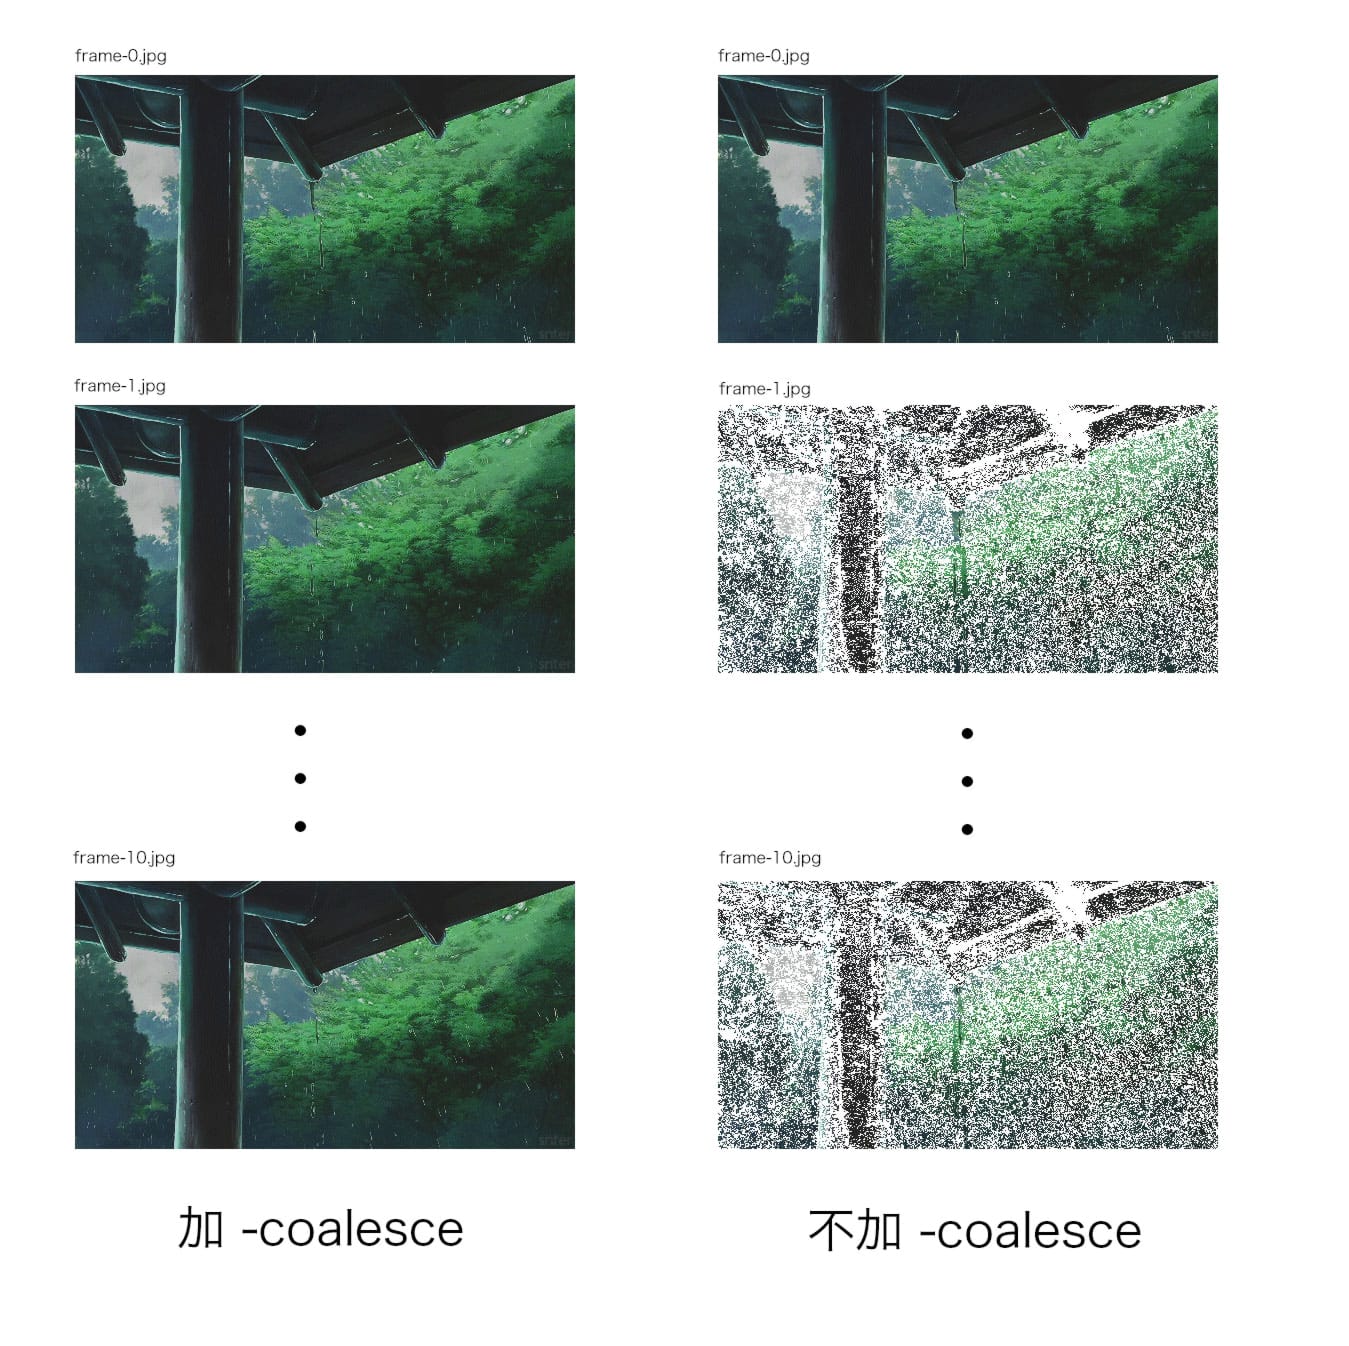
&$MagickPath convert -coalesce $InputFile ($SourceDirectory + '\frame.png') | Out-Null“-coalesce:根据图像 -dispose 元数据的设置覆盖图像序列中的每个图像,以重现动画序列中每个点的动画效果。下面用一张结果对比图来解释这句话。”
![]()
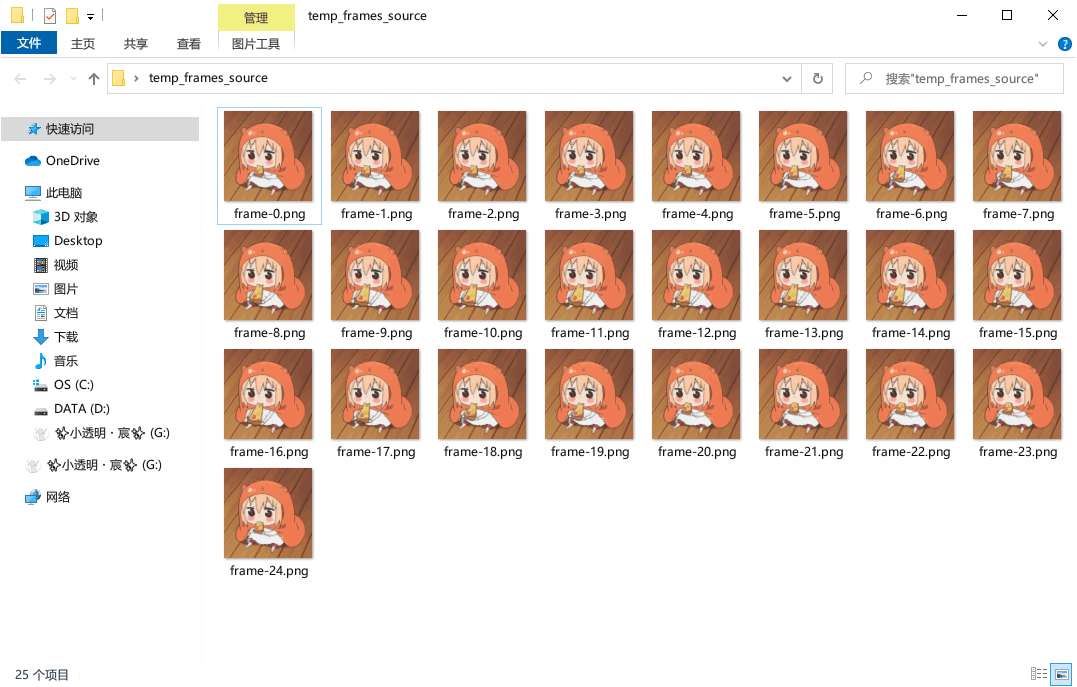
拆完图片以后,就能在 temp_frames_source 文件夹下看到一批 frame-0.png、frame-1.png……了。

使用 waifu2x 放大
waifu2x-caffe 支持将一整个文件夹输入,放大文件夹中的所有图片,所以这一步其实还是挺简单的?
&$Waifu2xCUIPath -i $SourceDirectory -o $UpscaledDirectory -y cunet -m noise_scale -s 2 -n 3 -p cudnn -b 8 -t 1 -- | Out-Null上面这个是我习惯使用的配置:3 级降噪、CUnet 模型、放大 2 倍、使用 cuDNN 和 TTA 模式。如果要修改的话,可以参考 README.md 里面的命令行参数说明~(请自备 Google 翻译)
这一步执行之后,在 temp_frames_upscaled 文件夹中也会出现放大后的每一帧的图片。
合成 GIF
使用 ImageMagick 从帧序列合成 GIF 的命令是 magick -dispose previous -delay 10 frame-0.png -delay 10 frame-1.png ... -delay 10 frame-X.png output.gif,可以通过拼接字符串来生成这些命令行参数:
$Params = '-dispose previous '
$Params += ([IO.File]::ReadAllText($InputDirectory + '\' + [IO.Path]::GetFileNameWithoutExtension($InputFile) +'.txt')).Replace("`r`n", ' ')
$Params += '"' + $OutputFile + '"'
if (-not (Test-Path $OutputDirectory)) {
    mkdir $OutputDirectory | Out-Null
}
Start-Process -FilePath $MagickPath -ArgumentList $Params -NoNewWindow -Wait
其中,帧序列的参数之前已经通过格式化输出保存到了文件中,在这里直接读取就可以了。
完整脚本
function Invoke-Waifu2xGIF([String]$InputFile, [String]$OutputFile, [Float]$Scale = 2, [Switch]$TTA = $false) {
    $Waifu2xCUIPath = 'D:\waifu2x-caffe\waifu2x-caffe-cui.exe'
    $MagickPath = 'D:\ImageMagick-7.0.8-Q16-HDRI\magick.exe'

    $InputFile = $ExecutionContext.SessionState.Path.GetUnresolvedProviderPathFromPSPath($InputFile)
    $OutputFile = $ExecutionContext.SessionState.Path.GetUnresolvedProviderPathFromPSPath($OutputFile)

    $InputDirectory = [IO.Path]::GetDirectoryName($InputFile)
    $OutputDirectory = [IO.Path]::GetDirectoryName($OutputFile)
    $SourceDirectory = ($InputDirectory + '\temp_frames_source')
    $UpscaledDirectory = ($InputDirectory + '\temp_frames_upscaled')

    &$MagickPath identify -format ("-delay %T \`"" + $UpscaledDirectory.Replace('\', '\\') + "\\frame-%s.png\`" ") $InputFile | Out-File ($InputDirectory + '\' + [IO.Path]::GetFileNameWithoutExtension($InputFile) +'.txt') -Encoding utf8
    if (-not (Test-Path $SourceDirectory)) {
        mkdir $SourceDirectory | Out-Null
    }
    &$MagickPath convert -coalesce $InputFile ($SourceDirectory + '\frame.png') | Out-Null

    &$Waifu2xCUIPath -i $SourceDirectory -o $UpscaledDirectory -y cunet -m noise_scale -s $Scale -n 3 -p cudnn -b 8 -t ([Int32][Bool]$TTA) -- | Out-Null

    $Params = '-dispose previous '
    $Params += ([IO.File]::ReadAllText($InputDirectory + '\' + [IO.Path]::GetFileNameWithoutExtension($InputFile) +'.txt')).Replace("`r`n", ' ')
    $Params += '"' + $OutputFile + '"'
    if (-not (Test-Path $OutputDirectory)) {
        mkdir $OutputDirectory | Out-Null
    }
    Start-Process -FilePath $MagickPath -ArgumentList $Params -NoNewWindow -Wait

    Remove-Item $SourceDirectory -Recurse
    Remove-Item $UpscaledDirectory -Recurse
    Remove-Item ($InputDirectory + '\' + [IO.Path]::GetFileNameWithoutExtension($InputFile) +'.txt')
}

# 调用示例
Invoke-Waifu2xGIF -InputFile 'input.gif' -OutputFile 'output.gif' -Scale 2 -TTA
最后是放大为原图尺寸 4 倍的小埋:

因为 GIF 格式过于古老,压缩效率太低,所以图片分辨率变大的话文件大小也会大量增加。可以使用这个在线小工具对 GIF 进一步进行各种有损压缩,降低文件大小。
(为了进一步压缩,上面的动图已经转换成 Animated WebP 了)
本作品采用知识共享署名-非商业性使用-相同方式共享 4.0 国际许可协议进行许可。不允许内容农场类网站、CSDN 用户和微信公众号转载。
本文作者:✨小透明・宸✨
本文链接:https://akarin.dev/2019/11/23/powershell-waifu2xgif/

